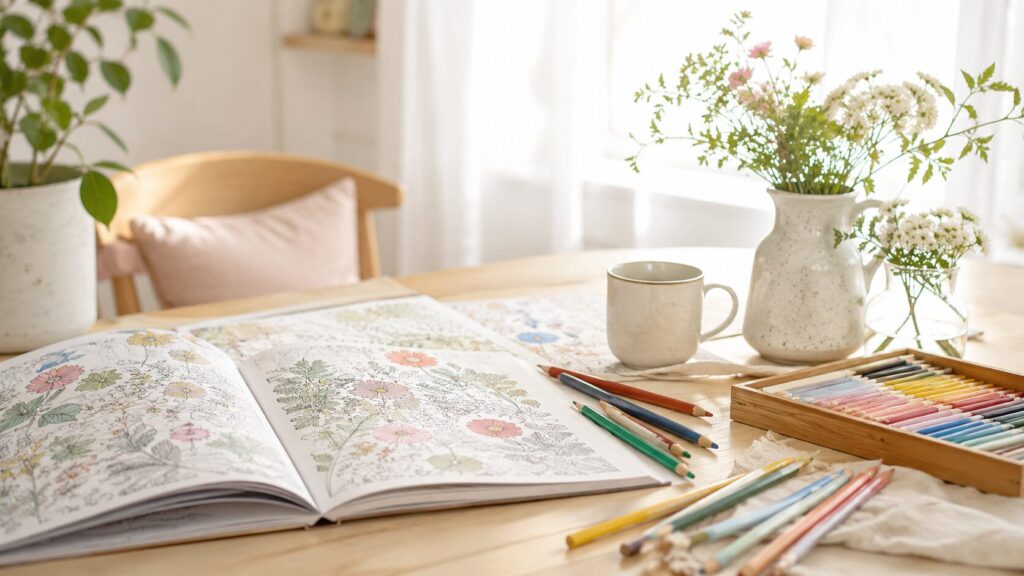
You find a cute free coloring page online and think, “This will be perfect for a quiet moment with my child.
” Then you print it, and the lines look too light.
One edge is cut off.
The paper feels thin, and when your child starts coloring with crayons, the page wrinkles right away.
Small printing problems like these can make a simple family activity feel more complicated than it needs to be.
The good news is that parent-child coloring does not require special art supplies or a professional printer.
A few small choices—paper type, print size, black-and-white settings, and a simple way to store finished pages—can make home printing much easier.
If you would like to start with a broader age-by-age guide to family coloring, you may also find this helpful
: Related article: A gentle age-by-age guide to family coloring
> Start with this simple setup > Print one page first.
Use A4 or letter-size paper, black-and-white printing, and standard quality.
> Regular copy paper is fine for the first try.
Use slightly thicker paper only when you want to keep or display the finished artwork.
Why a Little Printing Preparation Makes Family Coloring Easier
When children lose interest in coloring, it is not always because they cannot focus.
Sometimes the page is hard to see, the spaces are too small, the paper moves around, or the supplies take too long to prepare.
Printable coloring pages are convenient because you can download and use them at home.
But if you need to think through the printer settings every time, the activity can start to feel like a chore.
A simple home routine helps.
For example: print one page first, use black-and-white settings, place 12 crayons or colored pencils on the table, and put the finished page into a folder with the date written on it.
You do not need to make everything perfect.
The goal is simply to make the first page easy and pleasant to color.
Choosing Paper: Start with Copy Paper, Then Try Thicker Paper
Many parents wonder what kind of paper is best for printable coloring pages.
The answer depends on how you plan to use the page.
Regular Copy Paper Is Fine for Trying a Page
If you are trying a free printable coloring page for the first time, regular copy paper is enough.
It is affordable, easy to replace, and perfect for casual coloring sessions.
Copy paper also works well for young children who color with crayons.
If the sheet moves around, tape the corners lightly with masking tape or place the paper on a clipboard.
The best part is that children do not have to worry about mistakes.
If they want another try, you can print another page.
Use Slightly Thicker Paper for Artwork You Want to Keep
If your child wants to color carefully with colored pencils, or if you plan to display the finished page, slightly thicker paper is a good choice.
Thin paper may wrinkle under strong pressure, especially when a child colors the same area again and again.
You do not need to use thicker paper every time.
Everyday pages can be printed on copy paper, while special pages can be printed on better paper.
Be Careful with Markers
Even water-based markers can show through thin paper.
If your child uses markers, place an extra sheet of scrap paper underneath to protect the table.
For marker coloring, slightly thicker paper is usually safer.
Basic Printer Settings: Clear Lines and No Cut-Off Edges
This section helps solve three common problems: faint lines, cut-off edges, and unexpected sizing.
Printer menus differ by model, but the basic idea is the same for most home printers.
Use Black-and-White or Grayscale Printing
Most coloring pages do not need color printing.
A clear black-and-white outline is usually enough.
If the printable includes a color sample, you can view it on a phone or tablet instead of printing it.
If the lines look too light, check whether your printer is set to draft or eco mode.
These settings can save ink, but they may make line art too pale for children.
Try printing one page in standard quality and compare the result.
Try Actual Size First
For an A4 coloring page, start with A4 paper, actual size, and normal margins.
If you use letter-size paper, choose the closest matching setting and check the preview before printing.
If the edges are cut off, try “fit to page” or “shrink to printable area.” These options can help keep the whole picture on the page.
For a new PDF or image, print only one test page first.
What to Check When the Edges Are Cut Off
If part of the picture disappears, check these settings:
- Is the paper size correct?
- Is the page set to actual size, fit to page, or another scaling option?
- Is borderless printing turned on?
- Is the PDF viewer changing the size automatically?
- Is a phone printing app cropping the image?
Printing from a phone is convenient, but some apps adjust images automatically.
Before printing a special coloring page, look at the preview and make sure the full picture is visible.
Adjusting Print Size by Age: Big for Ages 3–6, More Detailed for Ages 7–10
Children enjoy coloring in different ways depending on their age and confidence.
This section focuses only on print size and page preparation.
Ages 3–6: Big, Clear, and Quick to Finish
For children ages 3 to 6, print coloring pages large.
A full A4 or letter-size page with bold outlines is usually easiest.
Large spaces are easier to color with crayons and thick colored pencils.
At this age, finishing the page often matters more than coloring neatly.
A page that can be enjoyed in 5 to 10 minutes is usually easier to fit into a family routine.
Related article: How to choose bold, easy coloring pages for ages 3–6
Ages 7–10: Try a Little More Detail
Children ages 7 to 10 may enjoy patterns, backgrounds, and slightly more detailed designs.
Start with a full-size page first.
If your child enjoys smaller details, you can try reducing the page size to A5 or half-page format.
Be careful not to make the design too tiny.
When a page feels too detailed, coloring can start to feel like a task.
It is perfectly fine to say, “You can finish just part of it today.”
Related article: How to choose slightly detailed coloring pages for ages 7–10
Matching Paper with Coloring Tools
The same printable page can feel different depending on the coloring tool.
For Crayons
Crayons are great for large spaces and relaxed coloring.
They work well on regular copy paper, especially for younger children.
If the paper slides, tape the corners, use a clipboard, or place a thicker sheet underneath.
For Colored Pencils
Colored pencils work on copy paper, but slightly thicker paper often feels better.
It holds up better when a child presses firmly or colors the same area several times.
For beginners, start with about 12 colors.
Too many choices can make children hesitate.
For Markers
Markers create bright results, but they can bleed through paper.
Place scrap paper underneath the coloring page and avoid stacking finished pages while the ink is still fresh.
If the finished artwork will be saved or displayed, use slightly thicker paper.
How to Save Ink When Printing Coloring Pages
Ink cost is a common concern when using printable coloring pages at home.
Fortunately, coloring pages do not need full-color printing every time.
The easiest method is to print only the black-and-white outline and only the number of pages you need.
It may seem convenient to print a large stack at once, but children’s interests change quickly.
Start with one or two pages and print more only if your child wants them.
If a printable includes a color example, show it on a phone or tablet.
You can say, “You can use these colors, or you can choose your own.” This keeps the activity flexible and saves ink.
Create a 10-Minute Coloring Setup
The key to continuing family coloring is not just printing the page.
It is making the whole activity easy to start.
Try keeping a small coloring kit in one box or file.
> 10-Minute Coloring Setup > - 1 to 3 printed coloring pages > - 12 crayons or colored pencils > - Scrap paper to place underneath > - A clipboard or masking tape > - A clear folder for finished pages > - A pen for writing the date and name
With this small setup, you can begin coloring during a quiet afternoon, after school, or on a weekend morning.
You can say, “Let’s color for 10 minutes,” and stop before anyone feels tired.
The real value is sitting together, choosing colors, and enjoying a calm shared moment.
Tips for Siblings
When siblings color together, print two copies of the same design and let each child choose their own colors.
This makes it easier to enjoy differences instead of comparing who did better.
If there is an age gap, prepare different levels of difficulty.
A younger child can use a large simple page, while an older child can try a slightly more detailed design.
You can also work on one page together: one child colors the background, another colors small details, and a parent writes the date.
Gentle comments help children feel proud of their choices.
- “The same picture looks so different with your colors.”
- “This one feels bright, and this one feels calm.”
- “I like the color you chose for this part.”
How to Store and Display Finished Coloring Pages
Coloring does not have to end when the page is finished.
A simple storage routine can keep artwork from piling up and help children feel proud of what they made.
Write the Date and Name
After the page is finished, write the date and the child’s name in a corner.
Later, you may look back and notice favorite colors, changing hand strength, or new details your child has started adding.
Use a Clear Folder
An A4 or letter-size clear folder is enough for storing finished pages.
You can organize by month, season, or theme.
You do not need to keep every page forever.
Save favorites and take photos of the rest.
Create One Display Spot
Choose one place to display a finished page: the refrigerator, a wall, a bedroom door, or a small frame.
When a new page is finished, replace the old one and move it to the folder.
This gives children a little moment of pride and keeps the home tidy.
Save Photos
If you cannot keep every sheet of paper, take a photo with your phone.
A monthly folder makes it easy to look back later, and you can share the photo with family members.
Recommended Steps for Printing Free Coloring Downloads
When printing a free coloring page, this simple order can help prevent common mistakes.
- Download one page first.
- Print it in black and white at standard quality.
- Check that the edges are not cut off.
- Let your child choose one page.
- Put out a small number of coloring tools.
- Stop after 10 to 20 minutes if needed.
- Write the date and save the finished page.
The most important point is not to print too many pages at once.
Leave room for your child to choose, and keep the preparation light for yourself.
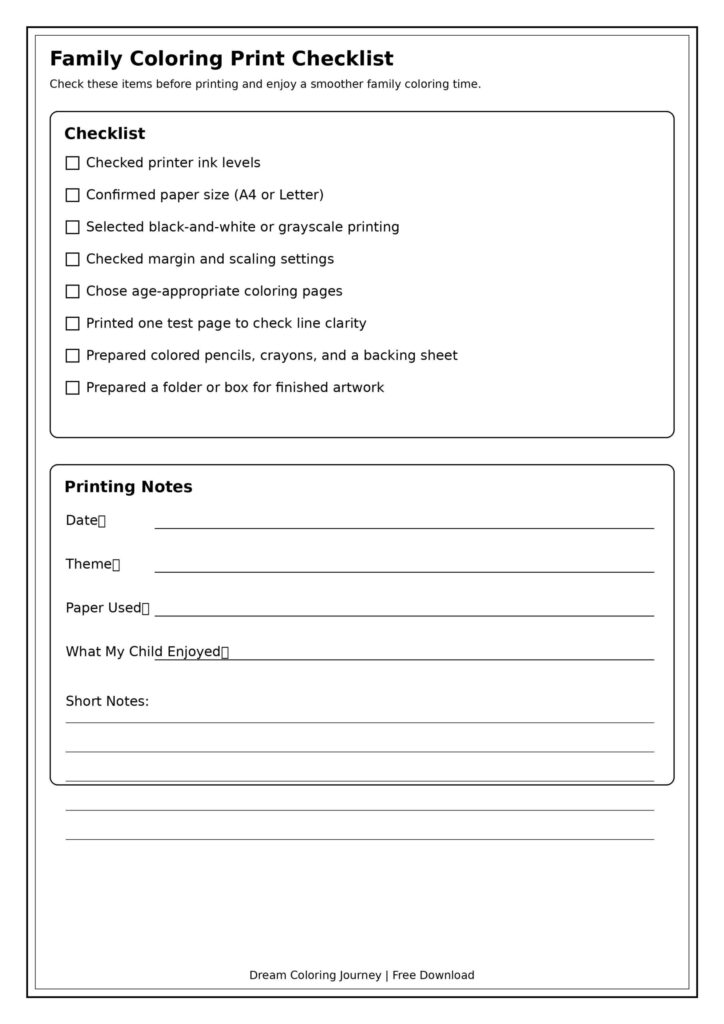
【Family Coloring Print Checklist】
A useful checklist could include a simple test coloring page, printer setting checkboxes, a name and date space, and a small “colors we used today” note area.
Frequently Asked Questions
Is regular copy paper okay for children’s coloring pages?
Yes.
Regular copy paper is fine for trying printable coloring pages, short coloring sessions, and casual crayon use.
If you want to keep or display the finished page, slightly thicker paper is easier to handle.
Should I print coloring pages full-size or smaller?
For ages 3 to 6, full-size pages are usually easier.
For ages 7 to 10, start full-size and try a smaller print only if your child enjoys detailed work.
When in doubt, print one full-size page first.
What should I do if the lines print too light?
Check whether your printer is using draft or eco mode.
Try black-and-white or grayscale printing at standard quality.
Print only one test page first so you can adjust without wasting paper.
Why are the edges cut off?
The paper size or scaling setting may not match the file.
Check the preview and look for settings such as actual size, fit to page, or shrink to printable area.
If you print from a phone, check whether the app is cropping the image.
How can I save ink?
Print the outline in black and white.
View color samples on a phone or tablet instead of printing them.
Also, print only the pages you need for that day rather than printing a large stack.
Do I need to keep every finished coloring page?
No.
Keep favorites in a clear folder and take photos of the rest.
This keeps the memories without creating too much paper clutter.
Conclusion
Parent-child coloring becomes much easier when the printing routine is simple.
You do not need expensive paper or complicated settings.
Start with regular copy paper, one full-size page, and black-and-white printing.
If your child wants to keep a special piece, print it on slightly thicker paper.
If markers are involved, place scrap paper underneath.
If the page is for a younger child, keep it large and clear.
For older children, try a little more detail while keeping the activity relaxed.
A small 10-minute coloring setup can also make a big difference.
A few printed pages, 12 colors, scrap paper, a folder, and a date pen are enough to turn a free printable into an easy family activity.
Finished coloring pages do not have to be perfect.
Add the date, place a favorite page in a folder, display one piece, or take a photo.
Over time, these simple pages become small records of shared afternoons, favorite colors, and quiet conversations.
For more family coloring ideas, you may also like: